Pretty In Bronze

Friday, October 19, 2018

belif Oil control moisturizer fresh & Eucalyptus herbal extract toner Review
October 19, 20180 Comments
Hello!

As you may or may not know, I've tested out a lot of skincare products over the summer. This is difficult because I need to use the skincare items for at least a few weeks on their own to know for sure how I feel about the products, and how my skin reacts to it. Right after writing my last skincare review I switched to these two products from belif since I received them in an Influenster Voxbox along with the VDL primers I posted about on Instagram a while back.

The products below are the Oil control moisturizer fresh & Eucalyptus herbal extract toner, as seen in the title. The moisturizer retails for $46 USD on their website and $34 USD for the toner.


While this is a K-beauty brand and Korean skin care is known as being amazing, I didn't love these. SO many people on Instagram rave about this brand, but these didn't do much for me. While they do not react badly with my skin and do do their job, these don't make my skin look amazing. They just make it look normal and helps maintain it.

The prices are too high in my opinion for something that doesn't make a big difference in my skin. These products are catered towards oily skin and I happen to have combination to dehydrated skin. I have noticed that the moisturizer doesn't make my skin become greasy during the day in my T-zone (the only parts of my face that become oily), however it does not moisturize the rest of my face enough and I do find that the toner dries out the dry patches on my face.

If you have truly oily skin I do think you should test these out if you get the chance if they offer mini's or samples (I'm not sure), but if your skin is more similar to mine, I highly recommend checking out Dermalogica if price is not a concern and you want amazing results,  Dr. Belmeur skincare for a similar price range, or if you're on a budge, The Ordinary, even though that company has had a lot of drama recently. I do truly love their products though so check out my top 5 from the brand.

Obviously this wasn't a great review, but I want to always be honest with everyone when I don't like something, especially because I've seen so much hype around this brand. I'll be back soon with another makeup review so I hope you'll stick around for that.

See you soon!
Essence Colour Correcting Liquid Concealers Review
October 19, 20180 Comments
Hello!

I finally have a review on the Essence Colour Correcting Liquid Concealers! I've had the yellow and pink for over a year now after being gifted them at an Essence event, and purchased the green a few months ago. These colour correctors retail for $3.99 USD on the website, and I believe it was on sale for $3.99 CAD when I picked up the green one.

Ever since purchasing the green, I've really started testing out all of them. I've been using the yellow as a concealer base for when I'm at my palest (Winter and Spring) since I have a very yellow skin tone and it basically works as a light coverage concealer on its own. Here are the concealers swatched on my arm (which was still darker from the summer).

I really like these in liquid form. I've been using the pink while my tan still fades to brighten up my under eye area before putting concealer on. It's been making a small difference, but I wish they had slightly darker shades since it's even too light for me in the summer. Perhaps a darker salmon colour, and darker versions of the yellow and green? 

The green has been working well for me, but I do find that I need to apply two or three layers and blend them out quickly first for it to not blend away when applying concealer or foundation on top. The yellow will remain for concealer when my tan is completely gone again.

In comparison to the colour correcting sticks, I definitely recommend these since they are so affordable and I find that most people don't colour correct very often. I will be reviewing the sticks soon since there are more colours available that would work for slightly deeper skin tones, and depending on your preference you might prefer a cream formula, so keep an eye out for that!

I hope you enjoyed my review. Even though I received two of these for free, all opinions are my own and I did purchase the green purely because I enjoyed the other colours enough! So far these are my favourite colour correctors that I've tried!

See you soon!


Sunday, October 14, 2018

Wet n Wild MegaGlo Makeup Stick - Highlight vs Essence Strobing Highlighter Stick Comparison Review
October 14, 20180 Comments
Hello,

Another makeup review! I have a lot of these coming up because I received so many products from PR a few months ago, so I wanted to make sure to get all of those reviews out of the way. Today I'm doing something a little bit different and I'm doing a comparison review between two very similar products that are both from the drugstore, and both from brands that I love (and yes, I received both for free). I have the Wet n Wild MegaGlo Makeup Stick Highlight in... highlight? It seems like only one shade, and the Essence Strobing Highlighter Stick in 'Light up Your Life'


The Wet n Wild highlighter retails for $3.99 USD and the Essence highlighter retails for $4.99, but is currently on sale for $2.49 USD. Both incredibly affordable!  Now for the swatches. The first image below is of these highlighters swatched next to each other. and the second picture is them both blended out. Wet n Wild is the first swatch (on the left) in both photos!


As you can see, these look almost identical. However, I do have a preference. While both look amazing on my face and last a very long time while wearing nicely, the Essence one is my favourite. It is my favourite because one quick swipe is enough to get the pigment I desire on my face, while still blending nicely around the edges. I also find that the Wet n Wild highlight is a tiny bit patchy in comparison, but when blending out there isn't much of a difference. The colour is the exact same on the face (and pretty much the exact same swatched on my arm). Essence also gets another point because there are two shades at the moment.

In the first pic below I'm using the Essence highlighter, which I blended out to make it more subtle, and then powdered on top a bit while setting my under eye.


I put on a bit of foundation earlier this week just to showcase these highlighters, one on each cheek, so excuse the lack of makeup. In this first picture I'm wearing the Essence Highlighter, and in the second one I'm wearing the Wet n Wild highlighter.


As you can see, there's barely any difference. I could wear one on each cheek and no one would be able to tell. Inspecting the highlighters closely, the Wet n Wild one seems a little bit more glittery, but it's very subtle so I don't mind.

I do, however, have one problem with both of these highlighters. Neither of these highlighters with the available (limited and non-existent) shade range would work well for anyone with deeper skin. I would like to see them expand the shades since these products are so great and affordable. If you have lighter skin and are thinking about picking one of these up (or both) I highly recommend and would definitely purchase with my own money and will purchase the essence one if it is still available in the decade that it'll take me to run through both of these highlighters.

See you soon!

Wednesday, October 10, 2018

Wet n Wild MegaGlo Makeup Stick Blush Review
October 10, 20180 Comments
Hello!


A few months back I received a huge package from the beauty brand Wet n Wild (well… their Canadian PR firm) and I’ve been working on testing out all of the products ever since. I’ve posted a few reviews so far, but now I have a bunch more. I haven’t been wearing makeup frequently at all (sometimes on the weekend) so it’s taken me months to truly develop a real opinion on several of the products.


Today I’m reviewing their MegaGlo Makeup Stick - Blush in the colour Hustle & Glow, which retails for $3.99 USD on their website. Before this I’ve only ever owned one other cream blush, and it was a ridiculous shade of pink that I never got any use out of. I was pretty scared to use this for the first time because I’m not a big blush girl. Including this one, I currently have 6 individual blushes in my whole makeup collection (and a few in palettes), which may seem like a lot, but for a ‘micro influencer’ who receives PR and buys a lot of makeup, that’s really nothing at all.

This blush cream blush is amazing! It applies sheer, but evenly, and layers very well. This means that you really can’t mess it up easily by applying too much in one swipe. Of course if you layer it without paying attention it might become too pigmented, but it blends out very nicely so it’s likely still salvageable. The colour works very well for me during the summer months, an I will continue trying it in the winter months, but I tend to shy away more from blush since my face becomes redder from the cold, so the last thing I want is to add pink to it.

This applies great over foundation, but I did not like it over powder. Some cream products work all right over powder (I had a cream highlighter that still worked amazing on it), but this isn’t one of those products. Not that I’d normally try, but I did for the purpose of this review. So if you accidentally powder your face before using this, go for a powder blush for the day instead. This also lasts for a very long time without fading, and when it does fade, it does so evenly, rather than patching off.

I've realized that I never show myself wearing products in my reviews, so here's a photo of my face while wearing my blush, where you can't really see the blush that well. I promise for future reviews to try actually ensure I have swatches. I tried getting a picture that would show the blush the way I like to wear it, but the truth is, I blend it out a lot so you can only really tell in person. I have it on in both photos!


Like I said before, I’m not a blush girl, so I don’t have much else to say. I highly recommend picking this up if you’re in the market for a cream blush! Would I purchase this myself? Yes if I were looking for a cream blush, but the odds of that are low since I don’t use it very often and will always reach for bronzer and highlighter above it unless I have enough time!

I hope you enjoyed this review. See you soon!

Sunday, September 30, 2018

Nutree Professional Amazonliss Smoothing Keratin Treatment Review
September 30, 20180 Comments
Hello!

So as some of you may know, I have naturally SUPER curly hair. It's hard to believe when you see pictures of me now, but my hair has been through a lot of treatments (view the end of this post to see my 100% natural hair). Two years ago was the last time I got a Japanese Permanent Hair Straightening treatment done, so most of my hair is back to being natural, with the exception of the very ends and hair colour since I have died it dark brown multiple times.

My hair is no longer spirals as much as it once did due to all of the heat styling on the regrowth, but it's still very curly and puffy. I've been wanting to get a keratin treatment done for a while now since it isn't permanent, which will allow me to eventually return to my natural hair (kind of) and would make my life much easier too. I ran into the opportunity to review this Amazonliss Keratin Treatment in exchange for the product a while back. It's been several weeks now since I've done the treatment and I can confidently say that I'm very impressed. I'm going to walk you through everything I had to do with pictures, and then I will give my final thoughts for this moment.


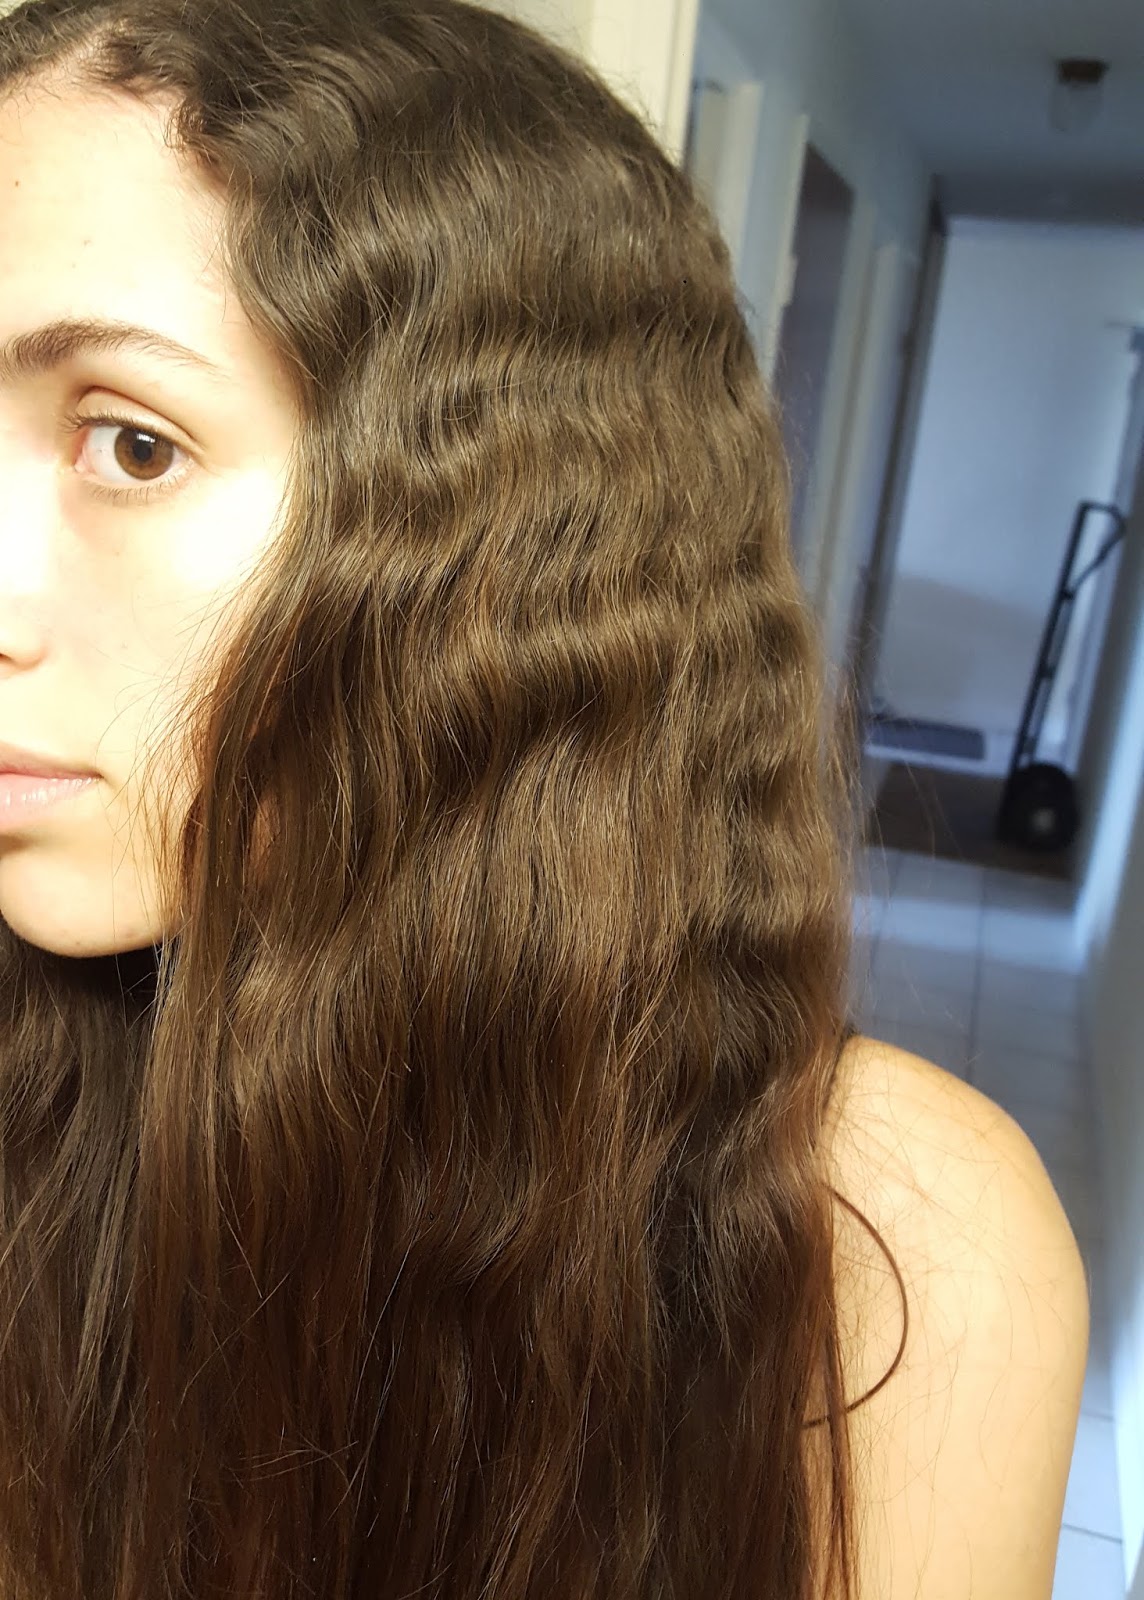
Below is what my hair looked like after washing it (I used theAnti Residue Shampoo from the kit) when about half dry. As you can see, it's pretty wavy and already starting to become a mess. The last picture shows you the type of ringlets I get on my less damaged hair.


After my hair dried naturally to about 85%, I sectioned it off and started applying the Brazilian Smoothing Treatment. This made it pretty wet again, but since it was sectioned off into multiple parts (as seen below), drying it completely with cool air wasn't too bad. The second picture below is my hair 100% dried after the Smoothing Treatment.


As you can see, it was already a bit straighter just from that. The next step was to straighten every single hair I could get my hands on. This took a very long time because the hair felt like there was a ton of product in it. While this product does not contain formaldehyde, this really burnt my eyes. I recommend some sort of eye protection because it was very hard to get through, even with my windows open and washroom fan on.


After finally finishing to straighten my hair and allowing my eyes to recover a bit, this was the result. It appeared very greasy, but that's ok because the next step was to wash it all out and use the Intensive Repair Mask.


Thankfully washing my hair out didn't hurt my eyes. I did stand under warm water for a long time before attempting to open them, but I had no issues. My hair felt insanely soft and silky while washing and using the repair mask. I've been exclusively using my Chorus Supernatural shampoo for other washes since doing the treatment since it does the job while being very gentle. I've washed it three times since (I wash my hair once a week) and so far no issues.


The next step was to dry my hair 100% (no temperature mentioned) so that's what I did, and I put it on high heat to make things quicker. I was very surprised at how much smoother my hair was after doing this. Yes, it's still wavy on top and requires me to straighten it every time, but it's a million times easier. I suspect that if you have regular wavy hair, or straight, but frizzy, that this would work perfectly without any straightening required.


Here's my hair after straightening! I didn't realize that I didn't do a great job straightening it here (I was also very impatient and tired after spending hours doing the treatment on myself), but this was very quick. From the time I started drying my hair to the time I was done straightening it, it had only been 20 minutes. Before the treatment this would take me about an hour and a half.


Now that I have washed my hair three times since doing the treatment, I feel comfortable giving this review. While it still takes a bit of time for me, this is 100% worth it and I will gladly purchase this product on my own when my hair is back to normal. My hair isn't as straight as it was the first time, which means it is wearing off rather quickly on me, but since I wash my hair once a week, I suspect it'll take two to three months to be completely back to normal. While that doesn't sound like a lot, this saves me a lot of time and trouble, so it makes the price worth it for me. The price on Amazon is currently $55 (USD), but that may go on sale so I will keep an eye out.

After six months to a year my hair will be completely natural again so I will be able to wear it curly when I want to, or straighten it. There is a lot of information on the product, where to purchase and before and after pictures on the Nutree Professional website, so please check them out for more information!

I will definitely be filming a follow up video in a month or two to update everyone on how well this has lasted, and to answer any questions people may have, or express concerns, but for this review with what I've seen so far I am super happy with the results, and recommend trying it out! Also, check out my 100% natural virgin hair before I ever had any treatments or colour ever done.


See you soon!

@beautybyamysousa