Pretty In Bronze

Monday, December 24, 2018

Wet n Wild Colour Icon Blush Review
December 24, 20180 Comments
Hello!

Back in the summer when I received a huge PR package from Wet n Wild, this Colour Icon Blush  in the colour 'Dare to Soar' from their Flights of Fancy collection was included. At first I thought it was a mistake because it looks way too dark, but you'll see from this post that it does work on light skin tones too.


 As you can see, if you swatch the blush lightly, it's not too crazy dark. Though if you build it up it becomes very vibrant so it would work very well on deep skin tones as well. Thankfully with a light hand, this works for me. Not sure if this would work on someone pale, but as a light medium girl with a yellow to olive undertone, this is great.


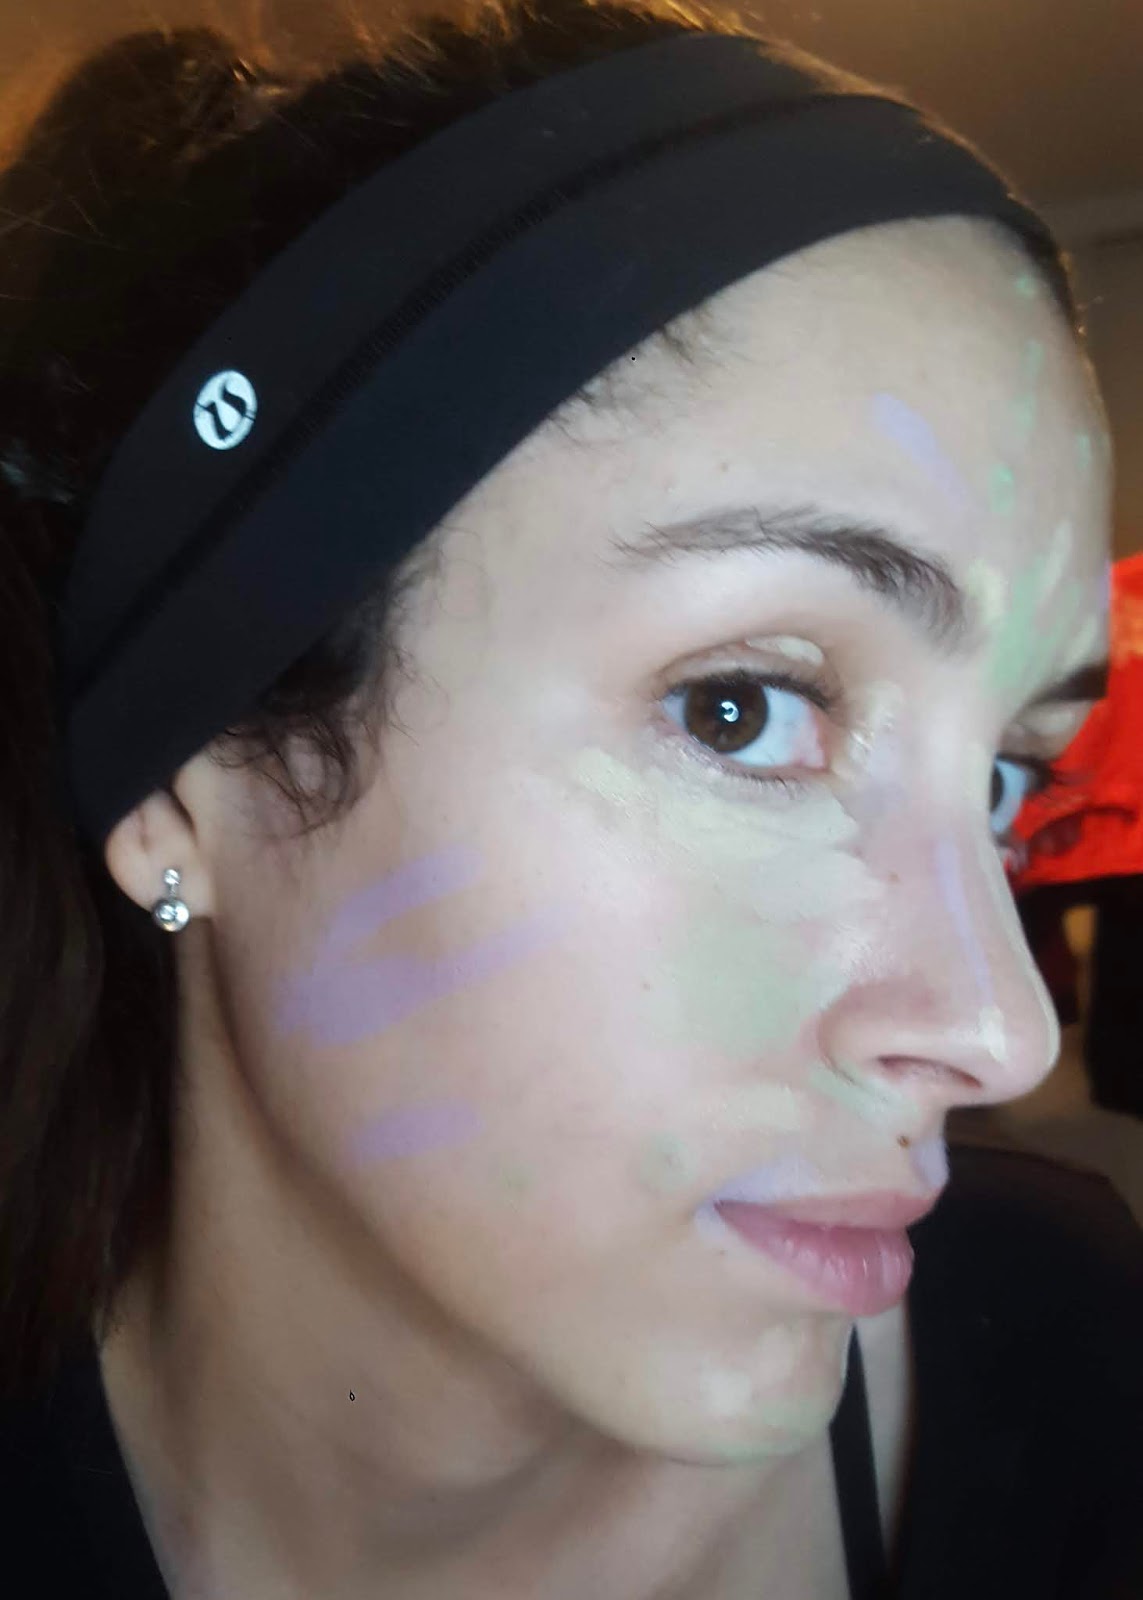
Below is what the blush looks like on my face when applied with a very light hand. I don't even sweep the brush in the blush. I just lightly tap it to make sure I don't accidentally pick up too much product. This blush gives a beautiful glow as well so I skipped highlighter so you can see what it looks like on its own. I do have contour out that I was taking pictures for (coming soon), but you can see how subtle this blush can be.


I applied the blush with a little bit more of a heavy hand on this side of my face to show you how I wear this. In the summer I just need to tap in a little harder for even more pigment. My mom has much darker skin than me, so I would probably lightly swipe for it to show up on her, but for deep skin I imagine you can swipe a regular amount to build the shade up on you.


Surprisingly this blush is still available on the Wet n wild website. I'm not sure if it's still in Canadian stores or not since it is from a limited edition collection from the summer. I did see it about a month ago in my local Rexall so there's a chance you may still find it, but I know a lot of people received this in PR so I wanted to show that while a blush might look scary, it doesn't mean that it won't work for you.

See you soon and Merry Christmas!

Saturday, December 15, 2018

Lancôme Teint Idole Ultra Wear Foundation Review
December 15, 20180 Comments
Hello!

I recently received an amazing voxbox from Influenster that included several full size Lancome makeup products. As usual, voxbox's are free and anyone can sign up for Influenster and receive them if you qualify based on your survey answers and score.


The Teint Idoe voxbox included a full size foundation, primer, lipstick and setting spray and I've been putting them to the test ever since. This review is focused on the foundation, but as I use the other products more I'll probably end up writing reviews on them too.


This is a matte foundation—a finish I normally stay away from because of my combination to dehydrated skin. I have a few dry patches on my face that foundations tend to cling to so I normally go for natural finishes or dewy foundations, but I've heard so many amazing things about this particular foundation (and still love my super old expired Lancome foundation) so I really wanted to give this a try. I even filmed a first impressions full day wear test  video that went up a few hours ago on my channel! Here's the video linked down below if you want to see what I thought the first time wearing it. If you want my full review; keep on reading!


This foundation really surprised me. First of all, the shade Bisque is a perfect match for my winter colour. It's very yellow so it's identical to my skin, so if you find foundations might look too yellow on you don't get that shade, but on me it's perfect. Most yellow undertone foundations are still too neutral for me so I was super pleased with the match.


The foundation is definitely matte, but I thought it would be full coverage. It's definitely a high medium coverage and could probably be built up to full, but I prefer how it looks with medium coverage because it looks more like real skin and the matte finish ends up being more of a 'natural' matte rather than looking too dry on me. At first it was a little bit dry, but after finishing the rest of my makeup, I noticed that it was setting in very nicely. It's one of those foundations that takes an hour or so to start looking really nice on your skin, which is amazing because on me that means it'll look amazing all day long.


This was a picture I took after wearing the foundation for about four hours. Makeup layered beautifully on top (especially the concealer) and I found that my bronzer, blush and highlighter wore longer than usual. My forehead, nose and sometimes chin can become shiny throughout the day, but with this foundation I found that it just looked more natural in those areas without anything breaking apart.

The only thing that I noticed after about eight hours of wear is that the foundation starts to settle into a few lines. On me it's under my mouth because I always contort my face to bite the inside of my cheek (weird... I know), but my forehead lines that ALWAYS look bad with a matte foundation looks completely fine as long as I bake it with a translucent powder for a few minutes after blending out my concealer.  Almost all of my foundations settle into my forehead and under my mouth so this isn't anything new for me, but I always like to mention it in reviews.

I included a quick clip that didn't make it into my first impressions video of a five hour check in below!


My final thoughts on this foundation is that I love it! It wears for a ridiculous amount of hours and looks amazing all day long. The coverage is perfect for me and it works on my entire face, even though my skin is dehydrated, which causes it to create extra oils in my T-zone, and I have dry patches as well. Other makeup sits on top very well, so that's really nice and the colour is a perfect match for me, which never happens.

I highly recommend trying this foundation out. If you have oily skin, check out Samantha's video review that she filmed during her 12 days of foundation series giving her full review and thoughts on this foundation (she loves it too!). That's it for this review. I hope you stick around to watch the full first impressions video on this foundation to see exactly how well it wore all day long.

See you soon!

Thursday, December 13, 2018

Wet n Wild Megaglow Contouring Palette Review
December 13, 20180 Comments
Hello!

Today's review is on this Wet n Wild Contouring powder! This is another item that was sent to me back in the summer and it is in the shade Dulce De Leche, which for some reason isn't currently on their website. There only shade that is currently on the Wet n Wild website 'Caramel Toffee' is a bit darker, but it seems like only these two shades exist, which isn't great for anyone with a very light skin tone, or anyone with a medium to deep skin tone either. 


As you can see below, the shades are ok for my skin tone, but I did swatch these when I still had my summer tan.


I took these face pictures very recently, which is why I'm much lighter. My lighting situation at the moment is pretty terrible because I'm temporarily living in a basement with no natural light and there's no space for my studio lighting to be set up, so I'm stuck with one light without the umbrella, and my makeup mirror light, which makes me look even more pale.

The contouring powder is currently a bit too dark for me, so I went in with an incredibly light hand to show you how you can still make it work for you if you have a light skin tone. I just put some along the edges of my cheekbones to make them look more prominent, along the edges of my face, a tiny bit dusted over my nose and then lightly brushed into my crease to even out the face. As for the highlighting powder, I just placed it under my eyes.


As you can see, you can make the contouring powder subtle if it's too dark for you. What I haven't tried is mixing the contouring powder with the highlighting powder to dull it down a bit, but since they are both matte I would imagine that could help as well. Do I recommend this product? For $5 USD it's a maybe. I feel like there are other powders from Wet n Wild and Essence that are around the same price that could work better, but if you have the right skin tone for it, you'll probably enjoy it! I'm more of a 'no fuss' makeup person so I'd rather the product be more buildable rather than very pigmented so I don't have to be too careful with it.

I hope you enjoyed this short review! I have a few more to go for Wet n Wild reviews of the products I received in PR this past summer, but at least the end is very near!

See you soon

Wednesday, December 05, 2018

Essence Colour Correcting Sticks Review
December 05, 20180 Comments
Hello!

It's been a while since I reviewed the Essence Colour Correcting Liquid Concealers, but I've been trying out so many different products and have a bunch of reviews in the works. Now I can confidently say that I've put the also affordable stick version to the test to fully know my opinions on them. I received all of these for free, but that won't stop me from honestly reviewing them. Let's get started.


Below are swatches on my wrist.


The following two photos are how I used these correctors for the best result. The areas with the green are all parts of my face that have redness, including a few breakouts.  The yellow was used under my eyes and also sometimes mixed in with the green. The purple (meant for brightening) is above my lip and on the sides of my face where my skin looks a bit dull. The pink was added just below my eyes on the lash line since that area can appear quite dark.


I decided to go with a foundation that I know a lot of people have tried in the past. I'm wearing the Makeup Forever Ultra HD foundation here since it's pretty full coverage. I decided to go for this because let's be honest; If you're going through the effort to colour correct everything, you're probably looking for higher coverage.


The foundation itself didn't fully cover the green from the colour corrector. However, most people wear concealer so I tested that out as well below. I added the LA girl pro concealer since that is another well known one. It's pretty full coverage. The colour correctors in this stick formula don't stick well to dry patches and breakouts, so it made the concealer an foundation break apart around them, kind of rendering them useless.


Excuse the concealer lips from patting it around my mouth. My chin still kept some redness since the green seemed to blend away when applying the foundation and concealer. The photo below is the side view and as you can see, the purple doesn't seem to show through, and neither does the pink or yellow. Looking close up in a mirror you can see a bit of texture that normally wouldn't show up without using the colour correctors.


My overall review is that these aren't worth it. While they are very affordable, I MUCH prefer the liquid concealer version. Yes, those only come in green, yellow and pink, however I don't think the purple actually does anything (for me at least) and the other shade for the sticks was a tan colour that is too dark for my skin tone, so I gave it away a long while before writing this review.

That's it for this review! I only have a handful of older products to review left before moving on to only reviewing products as they come in. Let me know your thoughts on these colour correctors and if you also prefer the liquid version to these.

See you soon!

Monday, December 03, 2018

All About My Moissanite Engagement Ring
December 03, 20180 Comments
Hello!

This is just a small post I'm writing to talk about my engagement ring. This is not in any way meant to show off, but I wanted a place to put pictures of it so I can share them on Pinterest and have somewhere to link back to since this first photo is going around without linking back to me. I'll go more in depth of another big reason why I decided to share this after my description of the ring. Finally, I've also gotten A LOT of questions about the ring from pretty much every single person that has seen it, so I wanted to make a post where all of the information and links are provided to make everything easily accessible.


My ring setting is a 14k Rose Gold Petite Pave Cathedral engagement ring from James Allen. The website does a great job at showing you up close (360 degree view) what your ring will look like with different shaped stones as examples. My stone is a Charles & Colvard Forever One Colourless Cushion Moissanite. It's approximately 1.3ct in weight, but it measures 6.5mm wide (the same length on each side). We purchased the loose stone from Fire & Brilliance since they were having a sale that made it even more affordable and they are an official retailer so the lifetime warranty is included. We also bought the setting when it was on sale for 25% off. If you don't already know about moissanite, check out this FAQ page on the Charles & Colvard website.

I wrote a full experience post about James Allen since getting the setting from them ended up being a huge rollercoaster ride (and not the fun type). I won't be writing about my experience with Fire & Brilliance since I can just tell you now that they're perfect! Their customer service is amazing, they have very fast shipping and they deserve all the publicity!

I'm going to include a few close-up shots I took as I was writing this. The ring was not clean at all when I took these and I was just using my side-table lamp in the basement so you won't see it sparkle as much as the outdoor photo above, but you'll be able to see the details a bit better!


The last thing I wanted to show you is the ring adjuster I bought! So when I got my finger sized it was summer and about thirty degrees celcius outside. My fingers tend to swell quite a bit, so I was a size 5.5. I had it sized at two separate jewellery stores just to be extra safe. The second Steven put the ring on my finger when he proposed near the end of October I knew it was too big. It was quite cold out that day and is still very cold now that it's almost winter (fully showing thanks to Canada). I didn't want to send the ring back to have it resized since I'm pretty sure it'll fit fine in the summer, but I also didn't want to add one of the metal sizers since they scratch up the rings. After doing a bit of research, I found this plastic sizer that has a special memory material that I can slide into my ring without people being able to notice (I'm wearing it in the photo just above this paragraph).

This is the RINGO Invisible Ring Sizer and since the band of my ring is just under 2mm thick, the x-small size works perfectly. It was under $12 CAD so way cheaper than resizing or having metal balls added to the band. I will eventually order directly from their website so I can buy a bag of just this size, but on Amazon you can buy a multi-pack so I'll try using it for other jewellery I own.


 That's it for my engagement ring! I feel super weird posting this, but I know so many people wanted to know all about it and after Steven and I's experience having it made we wanted people to know more since a lot of the information I provide in my experience posts were not readily available online for Canadians.

Thank you so much for the support! Please let me know if you have any jewellery cleaners you swear by (specifically for 14k gold) since I clearly need to get some.

See you soon!


@beautybyamysousa